Simply Start Lightweight Backpacking
Do you dream of hiking down the trail with less effort? Has backpacking been more of a task than a joy? Are you a beginner to hiking? Anyone can be a lightweight backpacker if they put the effort in and do some research before they make gear purchases. There are many benefits to lightweight (ultralight) backpacking including the ability to hike faster and further with less fatigue or risk of injury caused by a heavy load. Lightweight backpacking makes it possible for people of all ages to do more in the backcountry. Starting your journey to transition to carrying less may seem like a daunting task, but with some support, it can be easier than you think and more rewarding than you ever expected!

Mariposa Lightweight Backpack in the Wind River Range - credit: Stephanie Baker (@thedancingwind)
The first beginning steps in lessening your load and transitioning to lightweight backpacking are focusing on the big three (your sleep system, backpack, and shelter). These will be your biggest weight savings, and even if you can only shave weight with these three gear items you will really feel the difference!
Sleep System for Warmth
Camp bedding will likely consists of a sleeping bag, ultralight sleeping pad and a lightweight ground cloth (under your sleeping pad). Think of the typical conditions you will be camping in and plan accordingly. It is especially important not to get caught up in "what if" scenarios: Think realistically about your trip. What will be the average temperature be at night? Having this information and knowing how you tend to sleep can help you save pounds in your pack while staying comfortable at night.
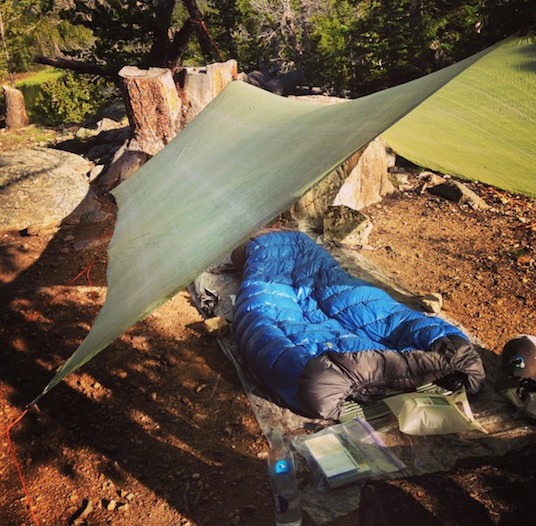
Shelter from the Weather
There is a huge variety of shelters available now and if you're using an old tent, you may be surprised by how much weight you can save by upgrading your shelter. There are many varieties including those that use trekking poles to support your shelter; eliminating the weight of tent poles (like our ultralight tarps).
Backpack to Carry your Gear
Switching to a lightweight backpack can save you pounds. Before making this purchase, make sure you know how many liters you will need to carry your gear and learn how to size a pack. Gossamer Gear has a wide variety of packs for all types of backpacking needs.

Backpacking gear organization before an adventure - credit: @sommer_spring
Rethink
There are some items that may seem like a good idea, but in reality, won't be necessary. If you are used to car camping, you may have brought some playing cards to burn a few hours at camp. While backpacking you will be surprised how much less time you spend at camp and items like cards will not be worth their weight. Think about the hiking gear that will safely and efficiently get you from point A to point B. Another great way to save weight is to leave your backpacking pillow at home and use a stuff sack with clothes inside as a replacement. Leaving out items is one of the biggest changes you can make to your overall pack weight.
Repackage
We really live by our motto: take less. do more. In addition to leaving certain items behind, you can repackage items such as toothpaste, sunscreen, and bug spray into small containers or eye dropper bottles. Avoid buying pre-assembled kits such as store bought first aid kits. The containers themselves are heavy and bulky, plus you likely won't use many of the items. A simple Ziploc bag is a great way way to store small items.
Replace
Buying new gear is the last option to consider, as you should be focusing on eliminating unnecessary gear before you spend any money on new items. However, there are opportunities to save weight and money by replacing items. Two examples include using a plastic water bottle instead of a Nalgene and swapping out your tent footprint for a polycryo ground sheet. Most shelters don't come with a groundsheet so you can save good chunk of money by using the polycryo instead of buying the manufacturer's ground cloth. You should also look to see if a bear canister is required in the area you plan to camp in. If not, hanging your food also saves a good deal of weight. When replacing items, you should spend your budget on replacing your heaviest and bulkiest backpacking gear. This will likely be your big three: sleep system, shelter, and backpack.
Ultralight backpacking tarp in camp - credit: Trinity Ludwig
Expert Hiking Tips
1. Think multi-purpose
One of the biggest weight savings is bringing gear that can serve multiple purposes. A pair of trekking poles can be beneficial for your knees on climbs and ascents, but can also be used at night to support your shelter. In a frameless lightweight pack such as the Gossamer Gear Mariposa, you can replace the SitLight pad with your own sleeping pad to give the pack more structure and provide additional padding for your back. A lightweight bandana can function in multiple ways such as a washcloth, towel, bandage, hat, water pre-filter, and handkerchief.
2. Learn some skills
It may take a little work (and lots of practice) but knowing how to set up (and where to set up) a lightweight shelter makes all the difference. A double walled freestanding tent doesn't require a lot of skill to set up. But by gaining some knowledge and learning how to set up an ultralight shelter you could save pounds from your pack weight! Additionally, learning about campsite selection is also extremely beneficial to your comfort on the trail. Instead of setting up right next to a gorgeous lake, you can avoid mosquitoes, harsh winds, and morning dew by being in a more wooded area.
3. Reflect
Go on multiple shakedown hikes before a big backpacking trip. When you return home take a look at your gear and makes piles of gear used a lot, sometimes used, and never used. Unless it was a first aid or safety item (such as a location beacon or rain jacket), if you didn't use it, leave it out. It is important to learn how to use your gear and make sure it's practical before a big trip. By testing your gear on shorter backpacking trips, you are doing your best to ensure you have a more successful trip. Bad weather in the forecast? Make sure you're prepared for rain!

Great friends backpack to Mount Whitney- credit: Jack Haskel
While on your journey to start lightweight backpacking, know that it's a process and not something that happens overnight. With lightweight or ultralight backpacking, the focus really should be on getting more people outdoors and having enjoyable trips.
But if you really want to nerd out and go all in– create a gear list spreadsheet. Get your typical setup for backpacking and weigh everything. To weigh your gear, you will need to use a kitchen scale so you can measure your gear in ounces. The listed weight of your outdoor gear may not include items like tent stakes and stuff sacks so be sure to weigh everything instead of looking it up online. Once you know how much each item weighs, you can begin to eliminate that weight.

Weighing your gear- credit: Allison Driscoll
Make a spreadsheet of the gear you will be bringing for a specific trip or simply write it down. Remember, some of your gear (especially clothing) may need to change based on each trip because of the location or time of year you will be hiking. Make a spreadsheet online to easily edit your list. You can use an excel spreadsheet or Google Docs to share with friends.
We hoped this helps steer you down the path of lightweight backpacking.
Interested in learning more? Take a look at Gossamer Gear founder Glen Van Peski's advice on going lighter.